4. Object Oriented Programming

The following materials are derived from the Object Oriented Programming lecture. The video lecture is included at the bottom of the document.
Introduction to OOP
Object-oriented programming (OOP) is a computer programming model that organizes software design around data, or objects, rather than functions and logic.
Object Orientated Programming (OOP) is the dominant paradigm in computing and development. Most modern Programming Languages are OOP
- C++ - Mixed Paradigm, but supports OOP
- C# - OOP
- Java – OOP
- Python - Mixed Paradigm, but supports OOP
- Javascript - Mixed Paradigm, but supports OOP
Objects
OOP’s dominance is because of how we humans describe the world. We define and separate things on the basis of categories otherwise known as taxonomy.
Sea and land, sand and soil, plants and animals. Within each category we have subcategories - plants can be further defined by whether they are trees or shrubs and so on.
When designing games we talk about ’enemies’ or ’weapons’ with their own abilities or differences. Each category contains subcategories.
In OOP we define these categories as objects and the subcategory as a property. The potion object could have the property colour which could be set to blue.
![]() fig. 1 - Game objects
fig. 1 - Game objects
Principle Terminology
OOP has a number of key concepts that we need to understand in order to make effective use of it. In this lecture we will look at Objects, Classes, Inheritance, Polymorphim, Abstraction and Encapsulation.
- Objects - is an abstract data type. It can include multiple properties and methods and may even contain other objects.
- Classes - a class is a template definition of the method s and variables in a particular kind of object.
- Encapsulation – It describes the idea of bundling data and methods that work on that data within one unit. It is also used to hide the internal representation, or state, of an object from the outside.
- Properties - a member of an object that controls how one field may be accessed and/or modified.
- Composition – Objects can be composed of other objects
- Inheritance – Objects can be related to other objects
- Polymorphism – Objects can be used via references to their parent class
- Abstraction - A restricted class that cannot be used to create objects (to access it, it must be inherited from another class).
OOP in Unity
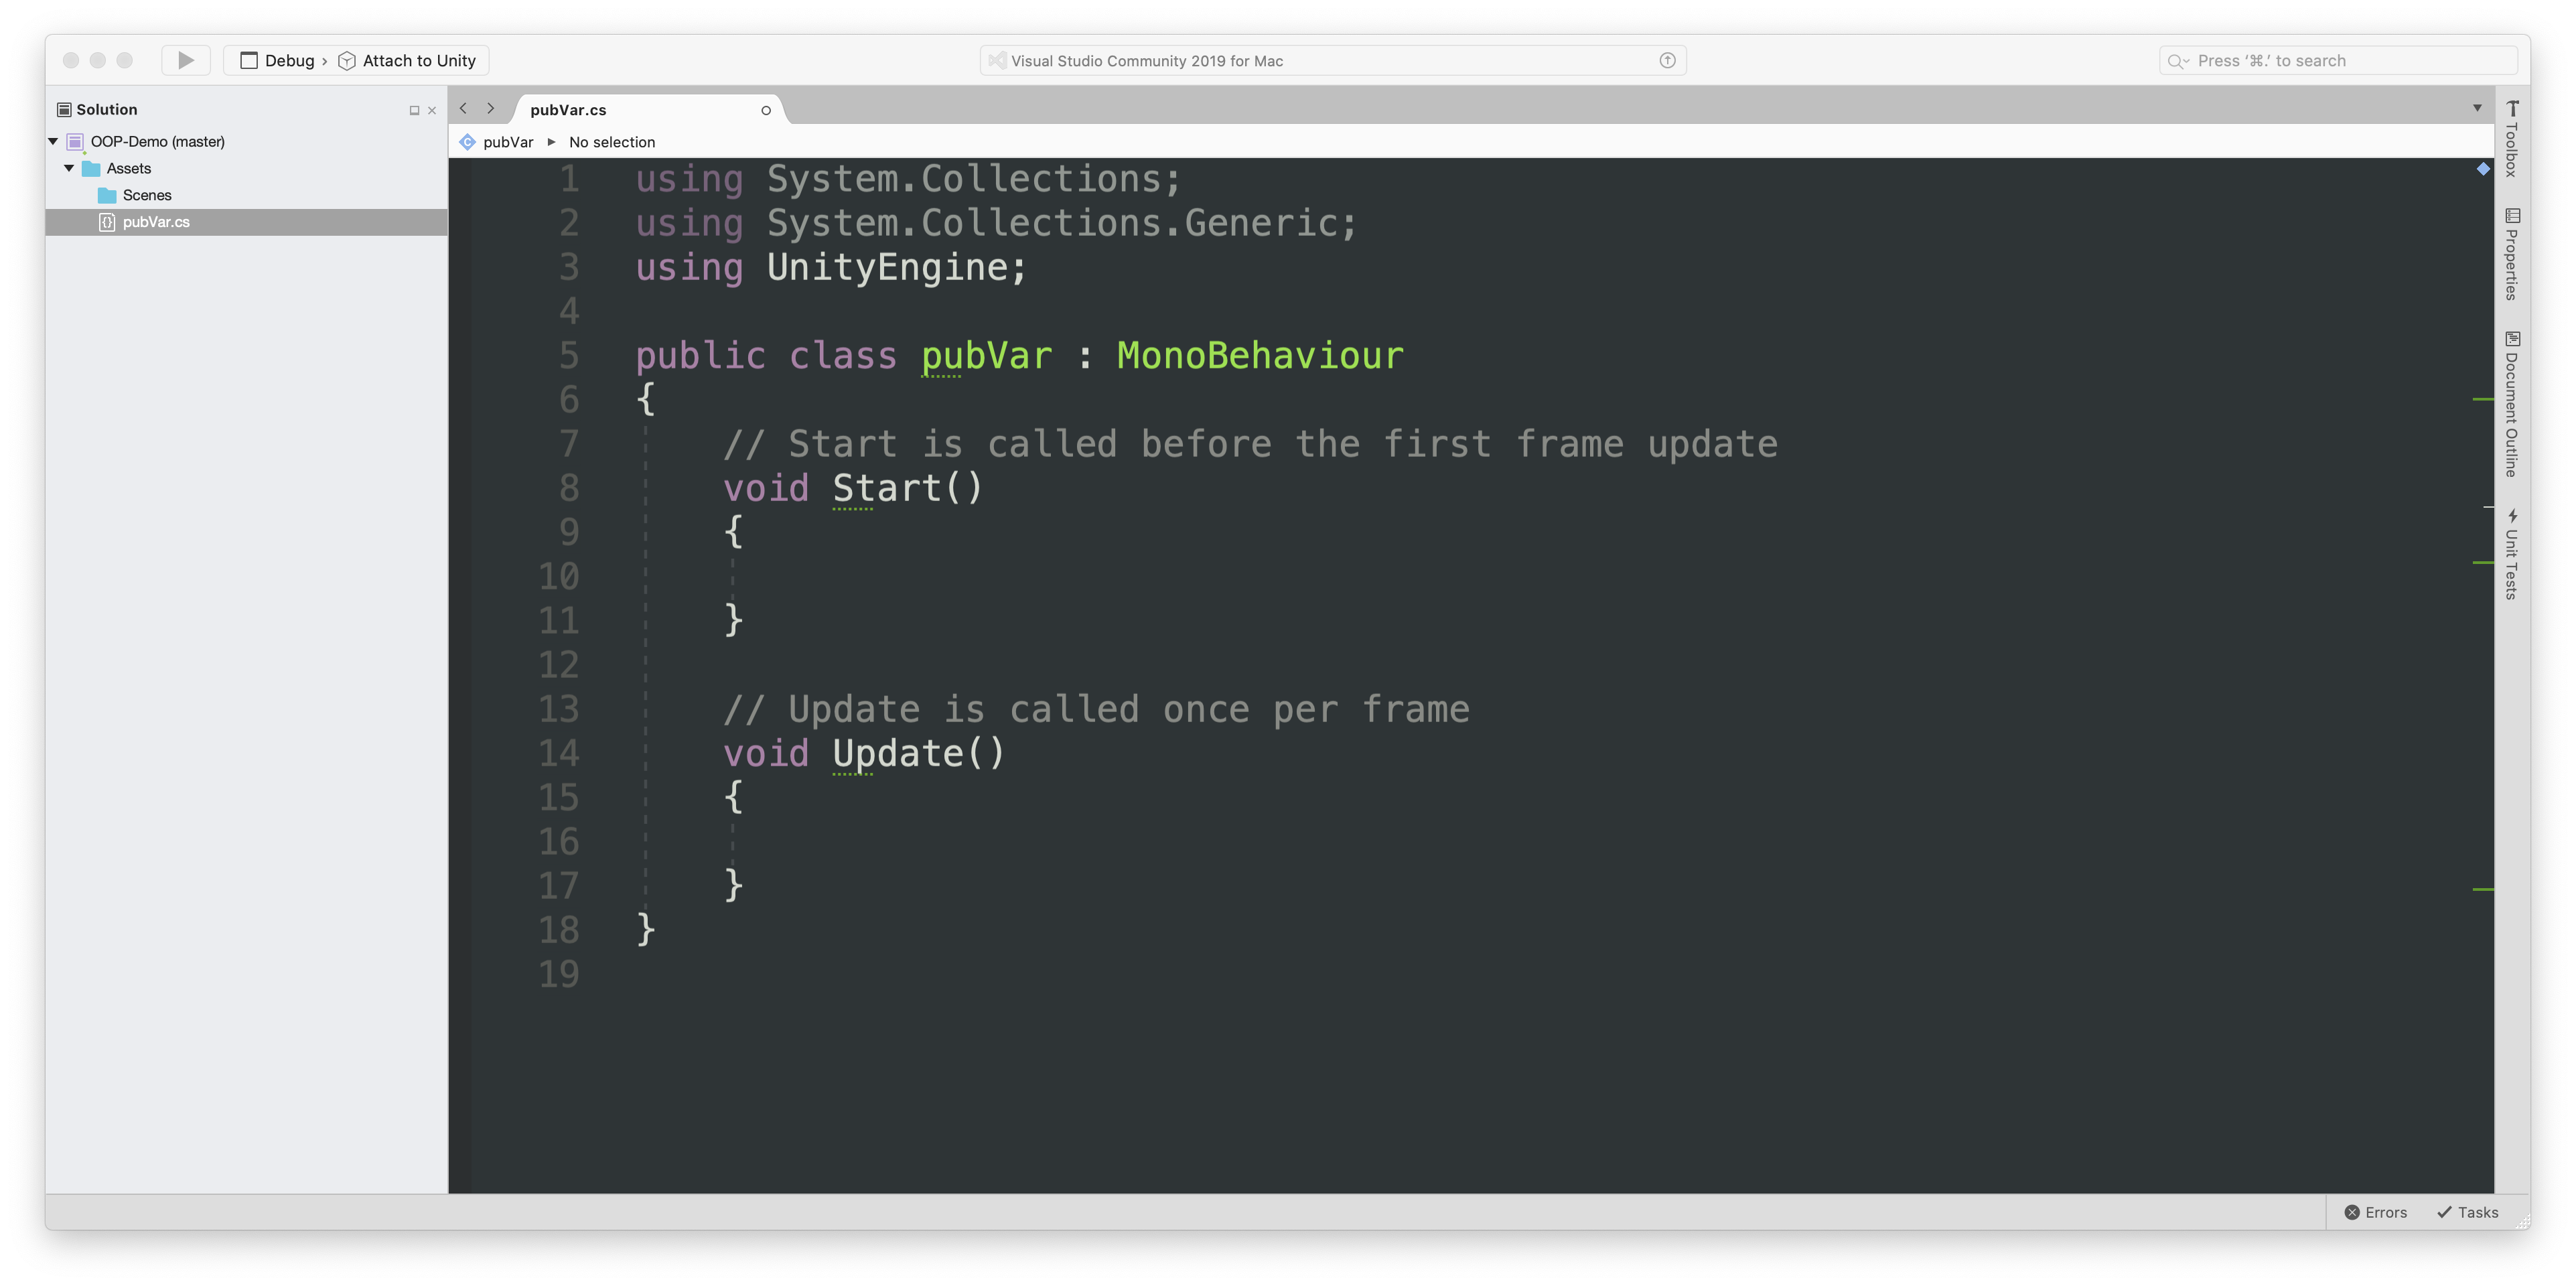 fig. 2 - Unity Class
Probably the easiest way to reference OOP in C# is to look at it’s application in Unity. You have probably seen classes being used in Unity before whenever you create a script file.
A new class is created with the name that you call the file. In this instance a file is called pubVar and the public class pubVar is shown at the top of the script.
Classes
You are probably wondering what’s the purpose of a class. Let’s look at an example. We are setting up the variables for a character and then we are going to define these variables for a specific character.
string name;
float strength;
int health;
bool isAlive;

//Create character
name = "Blackbeard";
strength = 25;
health = 15;
isAlive = true;
Now when we get to thinking about adding a second character it starts to get messy how do we track different variable values for different characters. Do we need to create completely separate variables for each character this seems very wasteful.
This is where classes come in.
So we can think of classes as blueprints or templates that we can use to define an object. This class of ours can have (click) member variables and these can be accessed anywhere inside this class. From our class we can create different instances of that class, using a constructor.
public class Character
{
	string name;
	float strength;
	int health;
	bool isAlive;
}
We use the name of the class as a data type and we can then create new unique variables that contain the properties of that class.
Character hero = new Character();
Character enemy = new Character();
Character guide = new Character();
Classes are Blueprints
 fig. 3 - A class is a blueprint
A class is a potential object, it is the instructions to create a real object in our code, like a blueprint. Like the relationship between a recipe to make a doughnut and the actual doughnuts that are produced. This is the best way to understand the concept.
In order to access our member variables from outside our class we need to make them public, we do this by adding the public keyword
public class Character
{
public string name;
public float strength;
public int health;
public bool isAlive;
}
and then when you instantiate a new class you can easily access the variables using the name of the new instance and change them just as you would with normal variables.
//create an instance of “character”
Character enemy = new Character();

//Access public variables
enemy.name = "Blackbeard";
enemy.strength = 25;
enemy.health = 15;
enemy.isAlive = true;
Encapsulation
Public vs Private members
Let’s add another concept - Encapsulation. In order to set a variable to public you have to define it using the word public preceding the variable type. If you want create a private variable you can explicitly define it as such using the word private (click). Private means that the variable can’t be accessed from outside the class. If you don’t include the word private or public the variable is by default private (click). These different states are also known as access modifiers.
public class  Character
{
 public  string name;
 public  float strength;
 public  int health;

//private member variable, Not available outside the class
 private  bool isAlive;
//by default member variables are private
 int score;
}
Remember that we can set the initial variable values inside the class. However if we don’t the default value will be ‘nil’.
public class Character
{
 public string name;
 public float strength;
 public int health = 100;
}
Public Variables in Unity
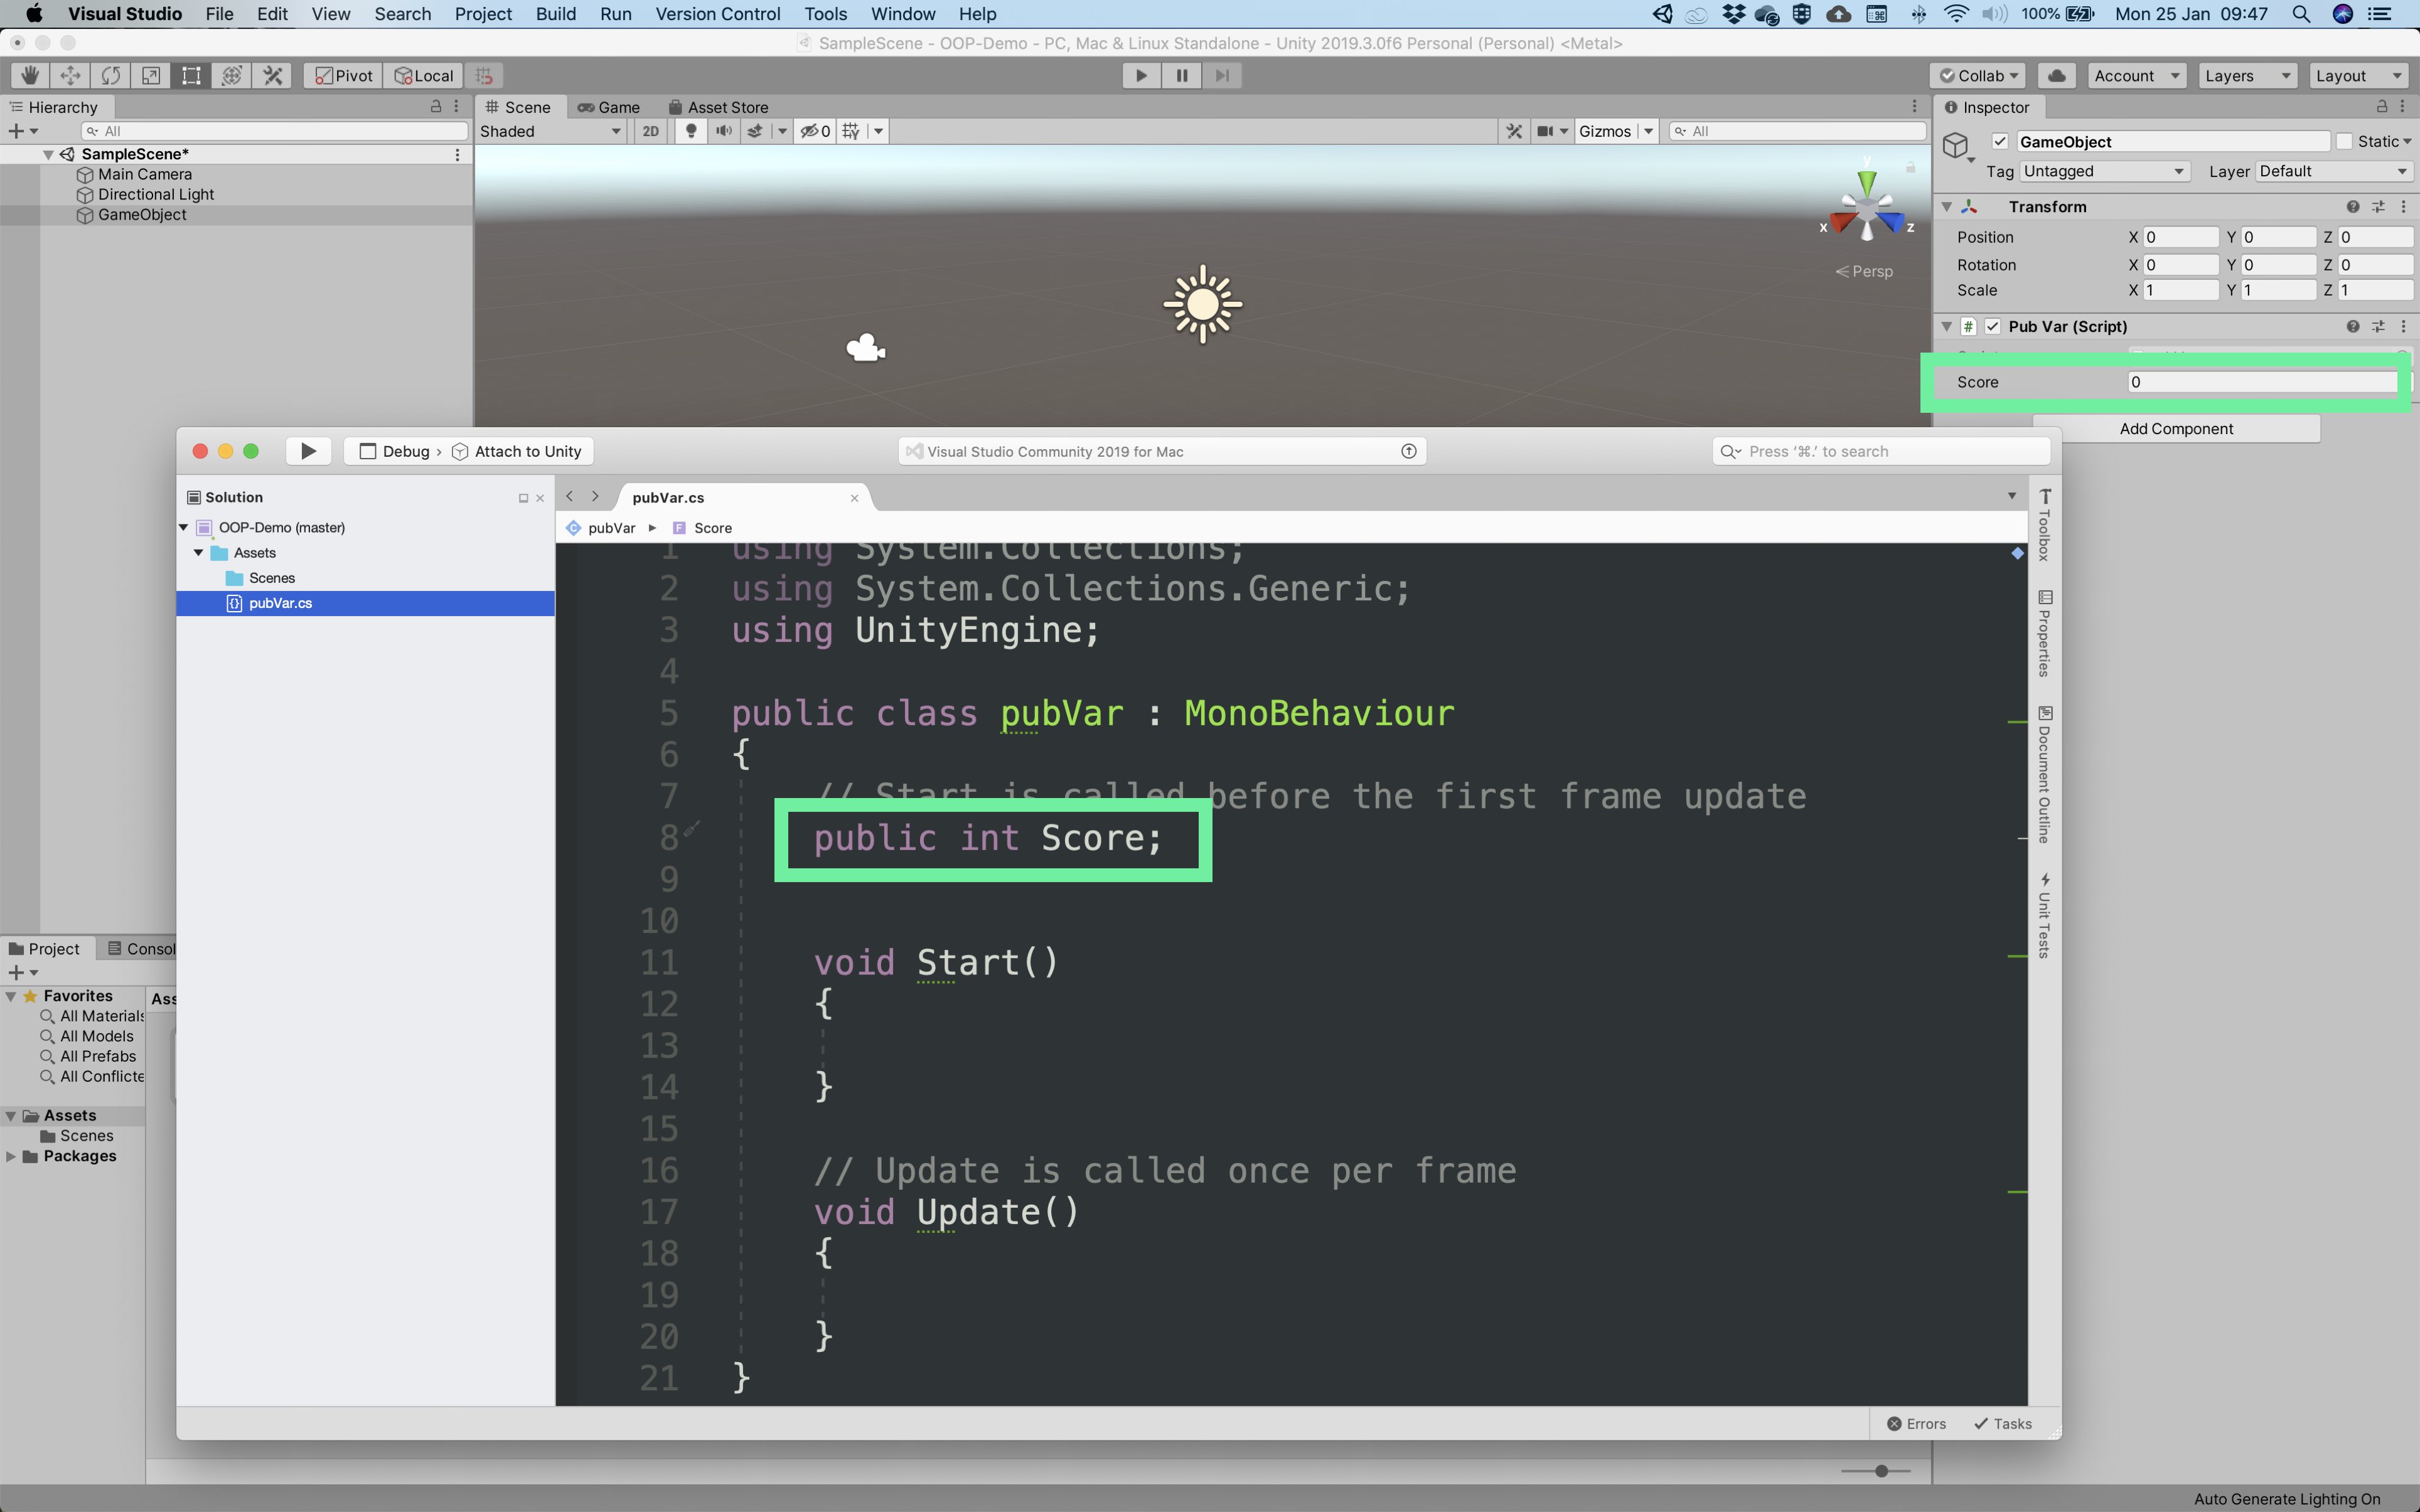 fig. 4 - Public Variable
Unity is by its very nature object oriented, so the principles are applied every time you create a script file which automatically creates a class. In Unity when we create a public variable in code it is made available to the inspector and we can assign a value to that variable from the Unity interface, either by writing a value in or by dragging a corresponding asset or object into the box. As you can see this example contains a variable score and the value zero is displayed in the inspector. The advantage of this is that variables and objects can be changed live in the UI view even while we are running a game, which is invaluable for debugging.
Accessing Variables
So if we stretch our slightly tenuous doughnut analogy. The doughnuts on the shelves are private and not accessible to the outside world. The only way to access a private variable is to use a method.
Methods
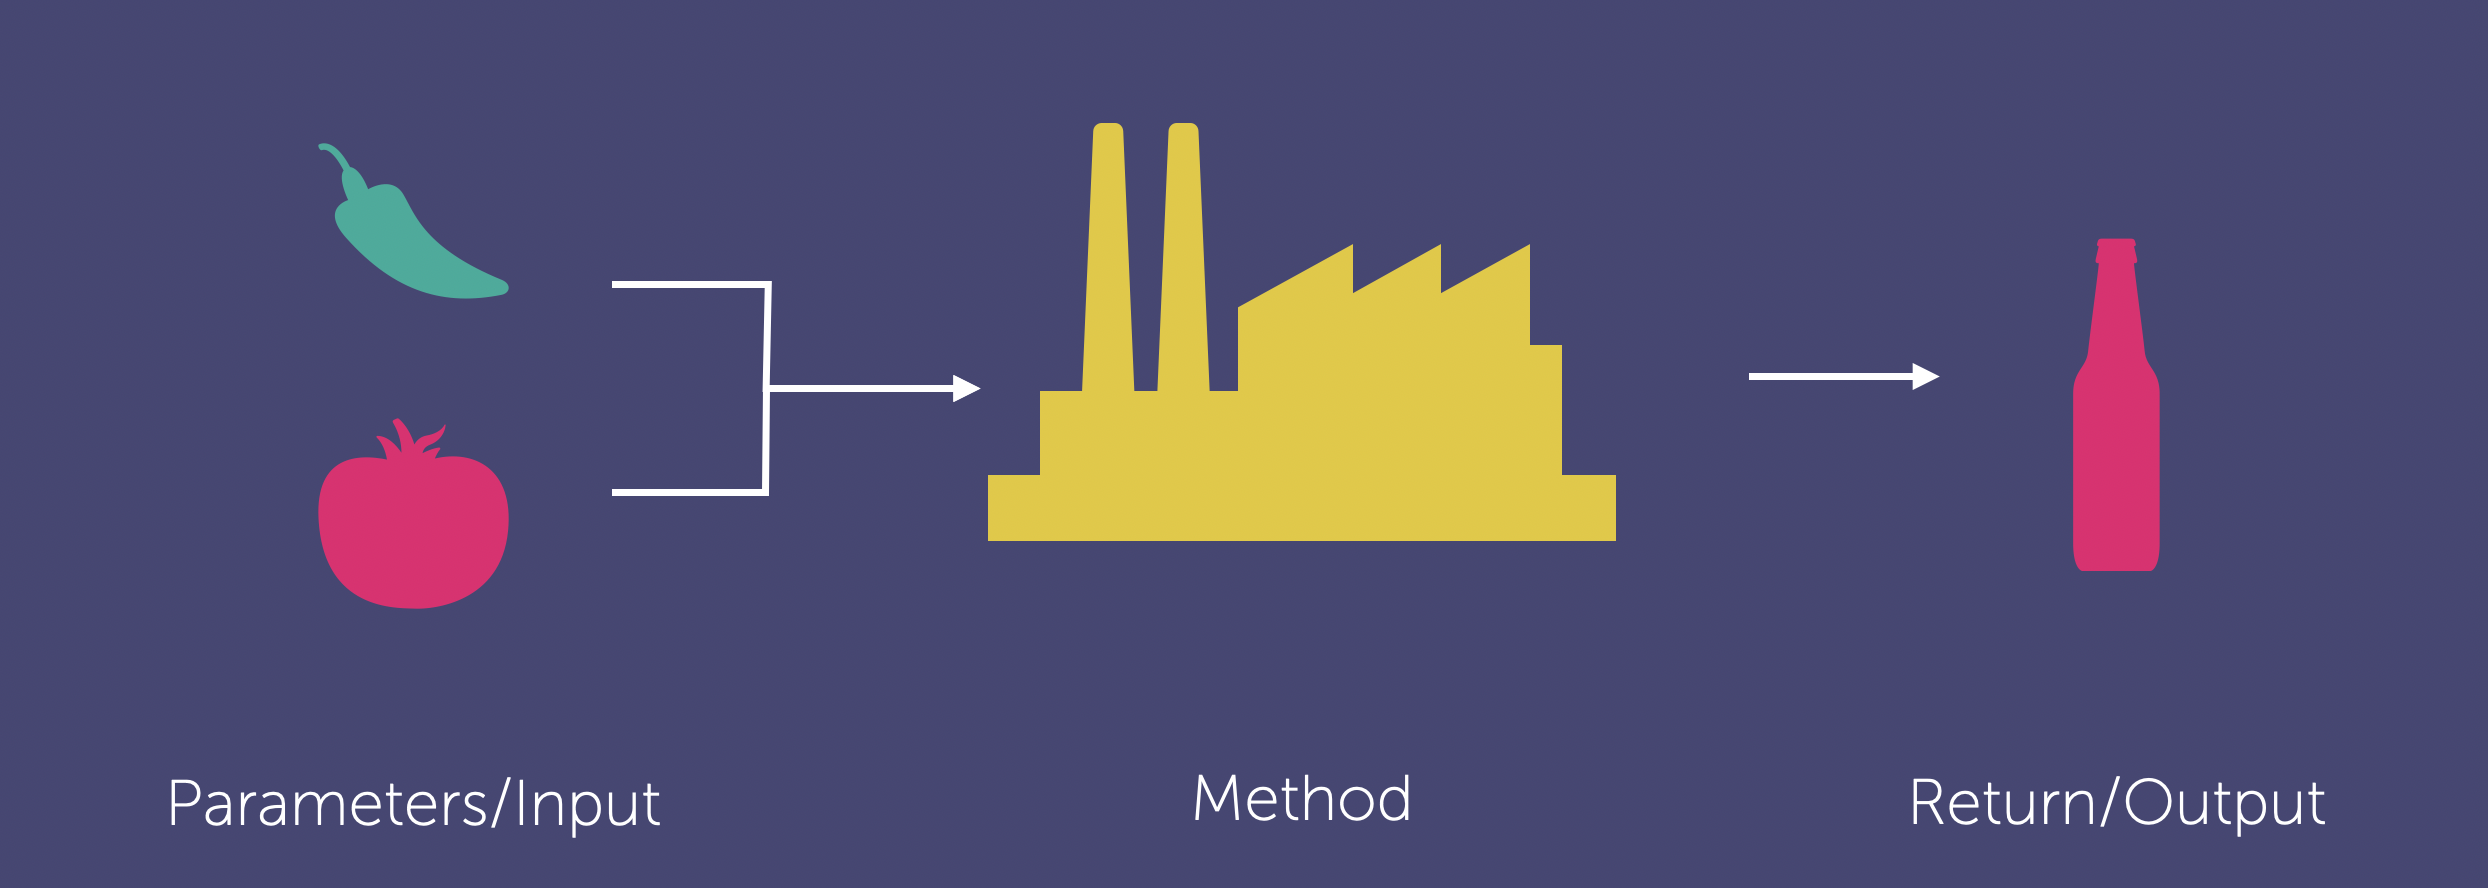 fig. 5 - Methods
We can use another analogy to describe how methods works, which is that of the factory. A method like a factory is a process that takes an input or multiple inputs to make it work and then it has a return or an output which is the final result of the processes undertaken in the method.
The analogy slightly breaks down, as it is not always essential for a method to have an input or an output to function. For instance a getTime methods does not need an input to tell you the time.
public class  Character
{
	public string name;
	public float strength;
	public int health;
	public void Attack()
	{
		Debug.Log("Character attacked");
	}
}
This shows how effective OOP can be. We can set-up multiple characters and allow them to use the same functions and methods we just address the specific instance of the class. In this case hero. As you can see we use void as this corresponds with a method or function that has no input parameters.
public class  Character
{
	public  string name;
	public  float strength;public  int health;

	public int updateHealth(int newHealth)
	{
		int health = health + newHealth;
		return health;
	}
}
In this example we have created a function in the character class called updateHealth with an integer parameter called newHealth (click) and we are going to call it via a method.
Character hero = new Character();
hero.health = 10;
int playerHealth = hero.updateHealth(20);
Here you can see we created the instance of hero and set it’s initial health to 10 and subsequently we update that health using a method in the variable that will pass the value of 20 to the ‘hero’ instance of the class. The final value of hero.health will be 30.
public class  Character
{
	public string name;
	public float strength;
	public int health;

	public int updateHealthStrength(int newHealth, int newStrength)
	{
	int health = health + newHealth;
	int strength = strength + newStrength;
	return health;
	}
}
We can easily add more parameters to our function and call them in the same way we did before.
Character hero = new Character();
hero.health = 10;
int playerHealth = hero.updateHealthAndStrength(20, 15);
Memory allocation of Objects
It is important to note that instantiating new instances of the class as objects as in the example here. Allocates a space in memory for each new instance. Which means each character has a portion of memory allocated to contain the member variables and other elements of the instance.
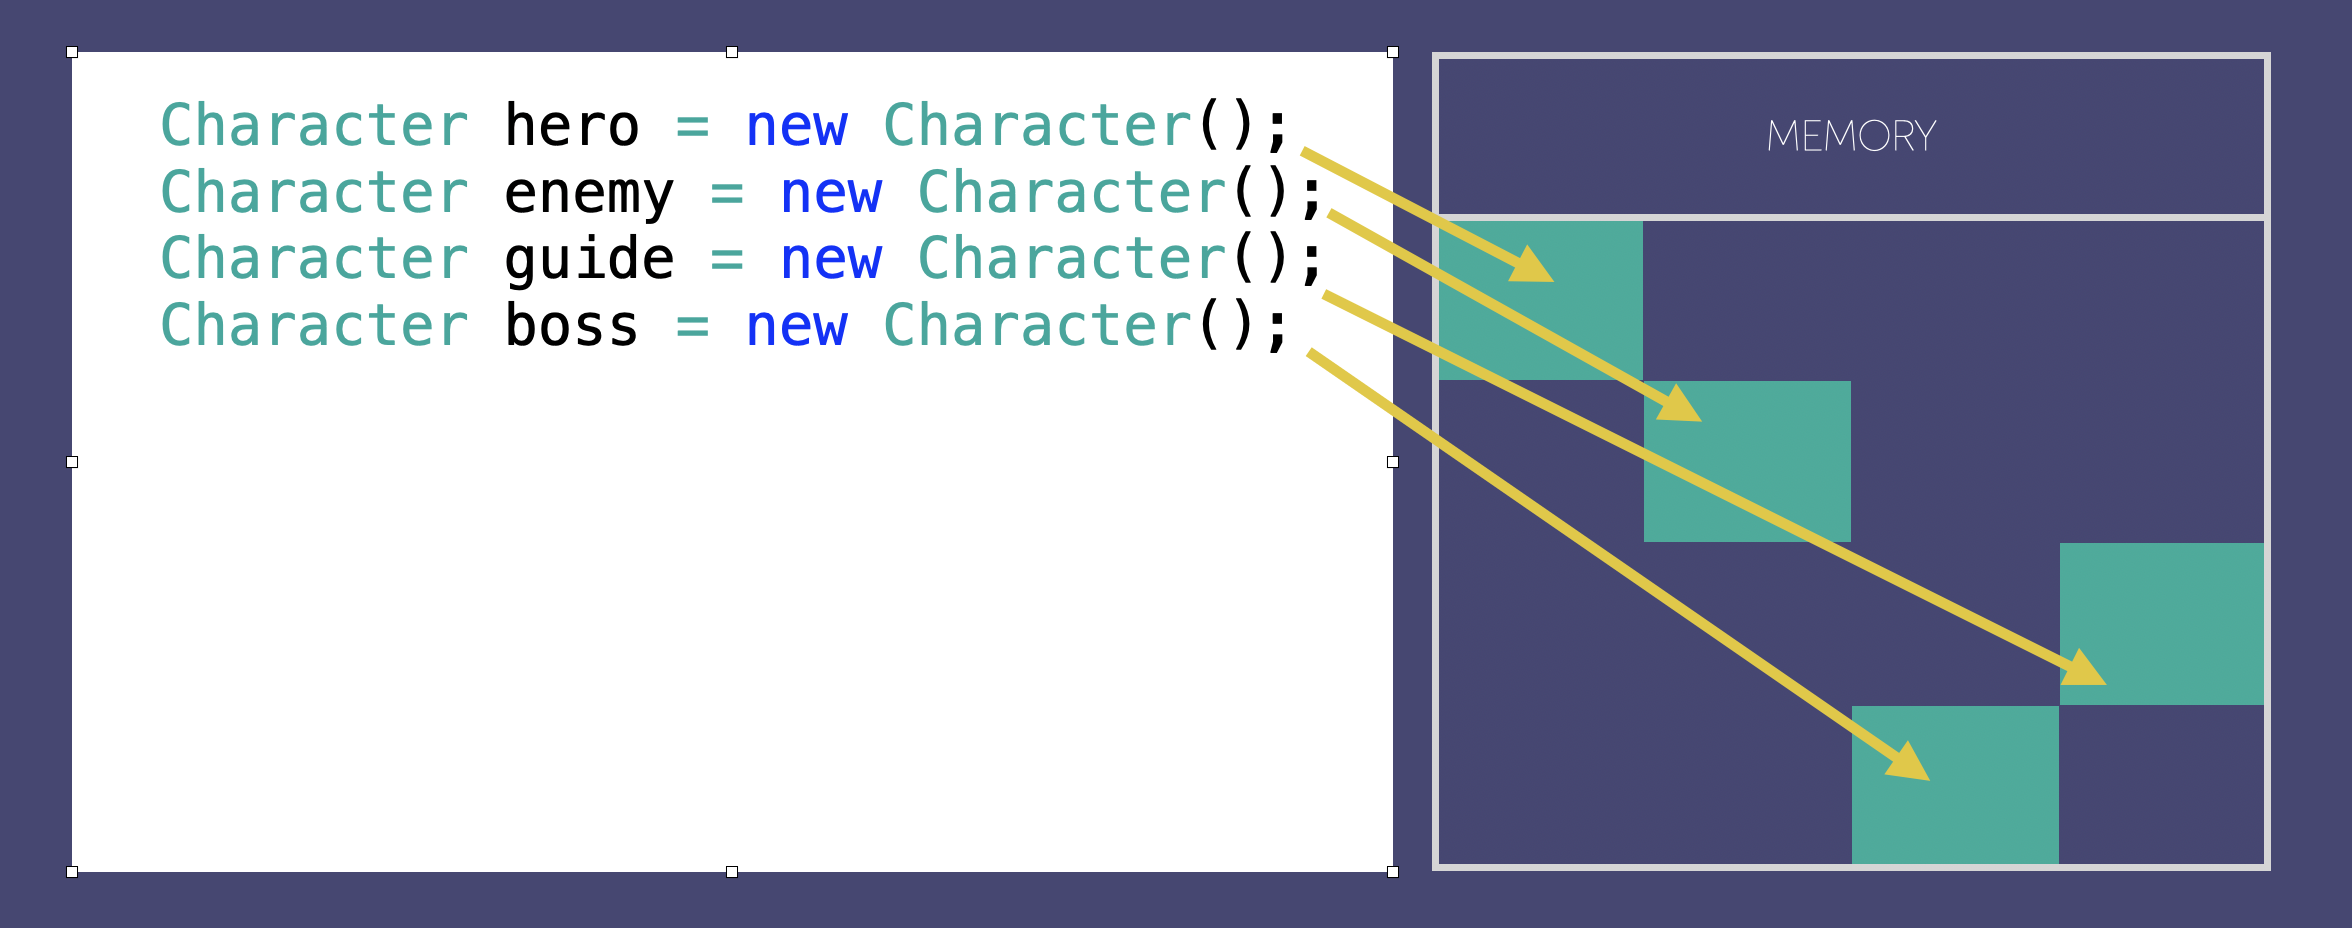 fig. 6 - Memory Allocation - existing instance
However if you create new instances of the class that are referencing an existing instance, there will be only one piece of allocated memory, so all the member variables will refer back to the original instance. If hero’s health is 20, then so will enemy’s, guide’s and boss’. It can be easy to make this mistake and end up resetting or changing everything with the same value when you wanted different values.
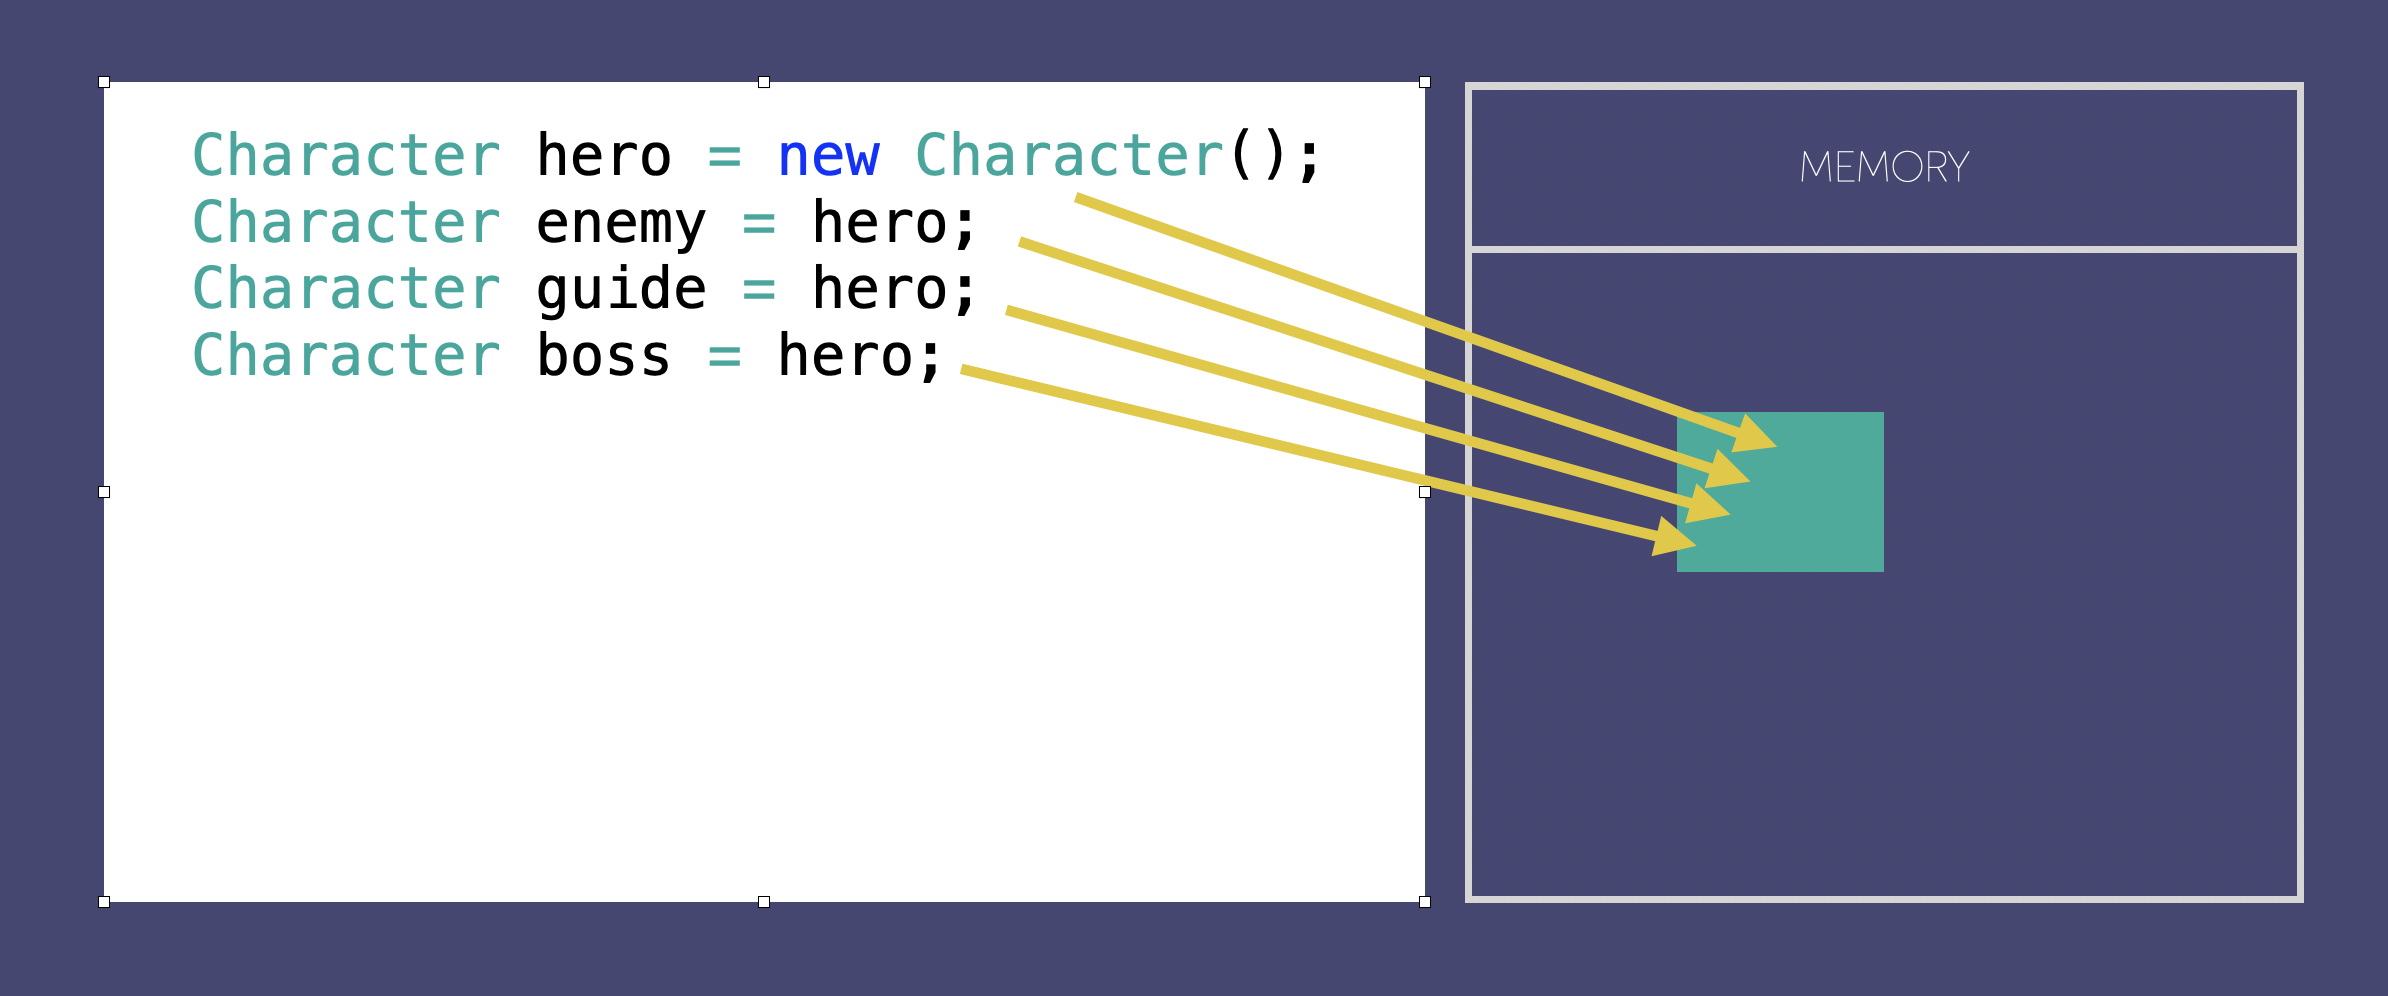 fig. 7 - Memory Allocation - new instance
Properties
In this example class player we have a variable called health. Conventionally when we want to share the contents of a variable, in the case of classes we can refer to them as fields we would make it public, but there is a better more secure way.
public  class  Player
{
	//Member variables can be referred to as  fields.
	private int health;
	//Health is a basic property
	public int Health
	{
		get
		{
			//Some other code
		}
		set
		{
			//Some other code
		}
	}
}
In this example class player we have a variable called health. Conventionally when we want to share the contents of a variable, in the case of classes we can refer to them as fields we would make it public, but there is a better more secure way.
Properties behave more like methods and we can enclose them using curly brackets and we can add other functions inside them. Inside our property we are going to use get and set and these are our known as access modifiers.
Now you may think this is a complicated way to access a private variable why not just make it public. Lets have a little look at get and set.
Access Modifiers
 fig. 8 - Get and Set
We can use the analogy of a house. If we set our field to public anyone or any method call can access it. If we set it to private it is not accessible from the outside. But sometimes we want a method to be able to read something but nothing else. Known as read only. In this case we can get something. in other instances we want it to be writeable, so we can set something but not readable, sometimes both. The great thing with get and set is we can control one part of the code without affecting other parts and it makes our code more secure because we are not exposing all variables at all times.
public  class  Player
{
	//Member variables can be referred to as  fields.
	private int health;
	//Health is a basic property
	public int Health
	{
		get
		{
			return health;
		}
		set
		{
			health = value;
		}
	}
}
You can see that the property Health with a capital imposes modifiers on the private field health. The external method can get a return of the value of the experience field so this is what is read which is get, and the experience field can be written to using the contextual keyword value which will set the value to whatever is defined in the method that is writing to it. This control of private and public through get and set is an extension to the concept of encapsulation.
As well as public and private there is another type of access modifier that is not covered here. A protected field can be accessed only by code in the same class, or in a class that is derived from that class. You can see how this type is used in the section on inheritance below.
For more information on access modifer types see the official Microsoft C# documentation.
Accessing Properties
In a new class called game We create an instance or an object called newPlayer from the class Player and now we can now adjust the field health through the property Health in much the same way as we did changing public member variables except in this instance the variable remains private but it has a read write access modifier applied to it.
public  class  Game
{
	void Start ()
	{
		Player newPlayer = new Player();
		//Properties can be used just like variables
		//Write
		newPlayer.Health = 5;
		//Read
		int x = newPlayer.Health;
	}
}
Inheritance
Inheritance is all about a parent chid relationship. The class Fruit has it’s own variables and methods and these can be accessed by child classes that contain the keyword operator :. Banana is now a child of Fruit and so is Apple. Let’s explore this concept a bit more.
class  Fruit  // base class (parent)
{
	protected  string  foodType = "Fruit"; // Weapon field
	public void eatFruit() // Weapon method
	{
		Console.WriteLine("Eating:" + foodType);
	}
}
class  Banana : Fruit  // derived class (child)
{
	public  string  fruitName = "Banana"; // Fruit field
}
class  Apple : Fruit  // derived class (child)
{
	public  string  fruitName = "Apple"; // Fruit field
}
As previously specified inheritance is about classes that inherit the variables and methods of their parent. This is defined by the colon operator. In fact it’s written with the child first and the parent after. In the code example form before we have the parent Fruit and the child banana. This goes back to our first discussion about OOP being about categorising. Inheritance is all about objects and their relationship. The child has access to both its parents features and its own.
Parents & Children
class Main
{
	// Create a myCar object
	Banana myFruit1 = new Banana();
	Apple  myFruit2 = new  Apple();

	// Call the eatFruit() method (From the Fruit class)
	// on the myFruit object
	myFruit1.eatFruit();
	myFruit2.eatFruit();

	// Print value of the fruit type field (from the Fruit class)
	// and the value of the fruitName from the Banana class
	Console.WriteLine(" name- " + myFruit1.fruitName);
	Console.WriteLine(" name- " + myFruit2.fruitName);
}
Here you can see that if we create a new instance of any of the children we can activate both the parent methods as well as the child ones. As they are inherited. The output would look like this:
Eating: Fruit
Eating: Fruit
name- banana
name- apple
Unity & Inheritance from MonoBehaviour
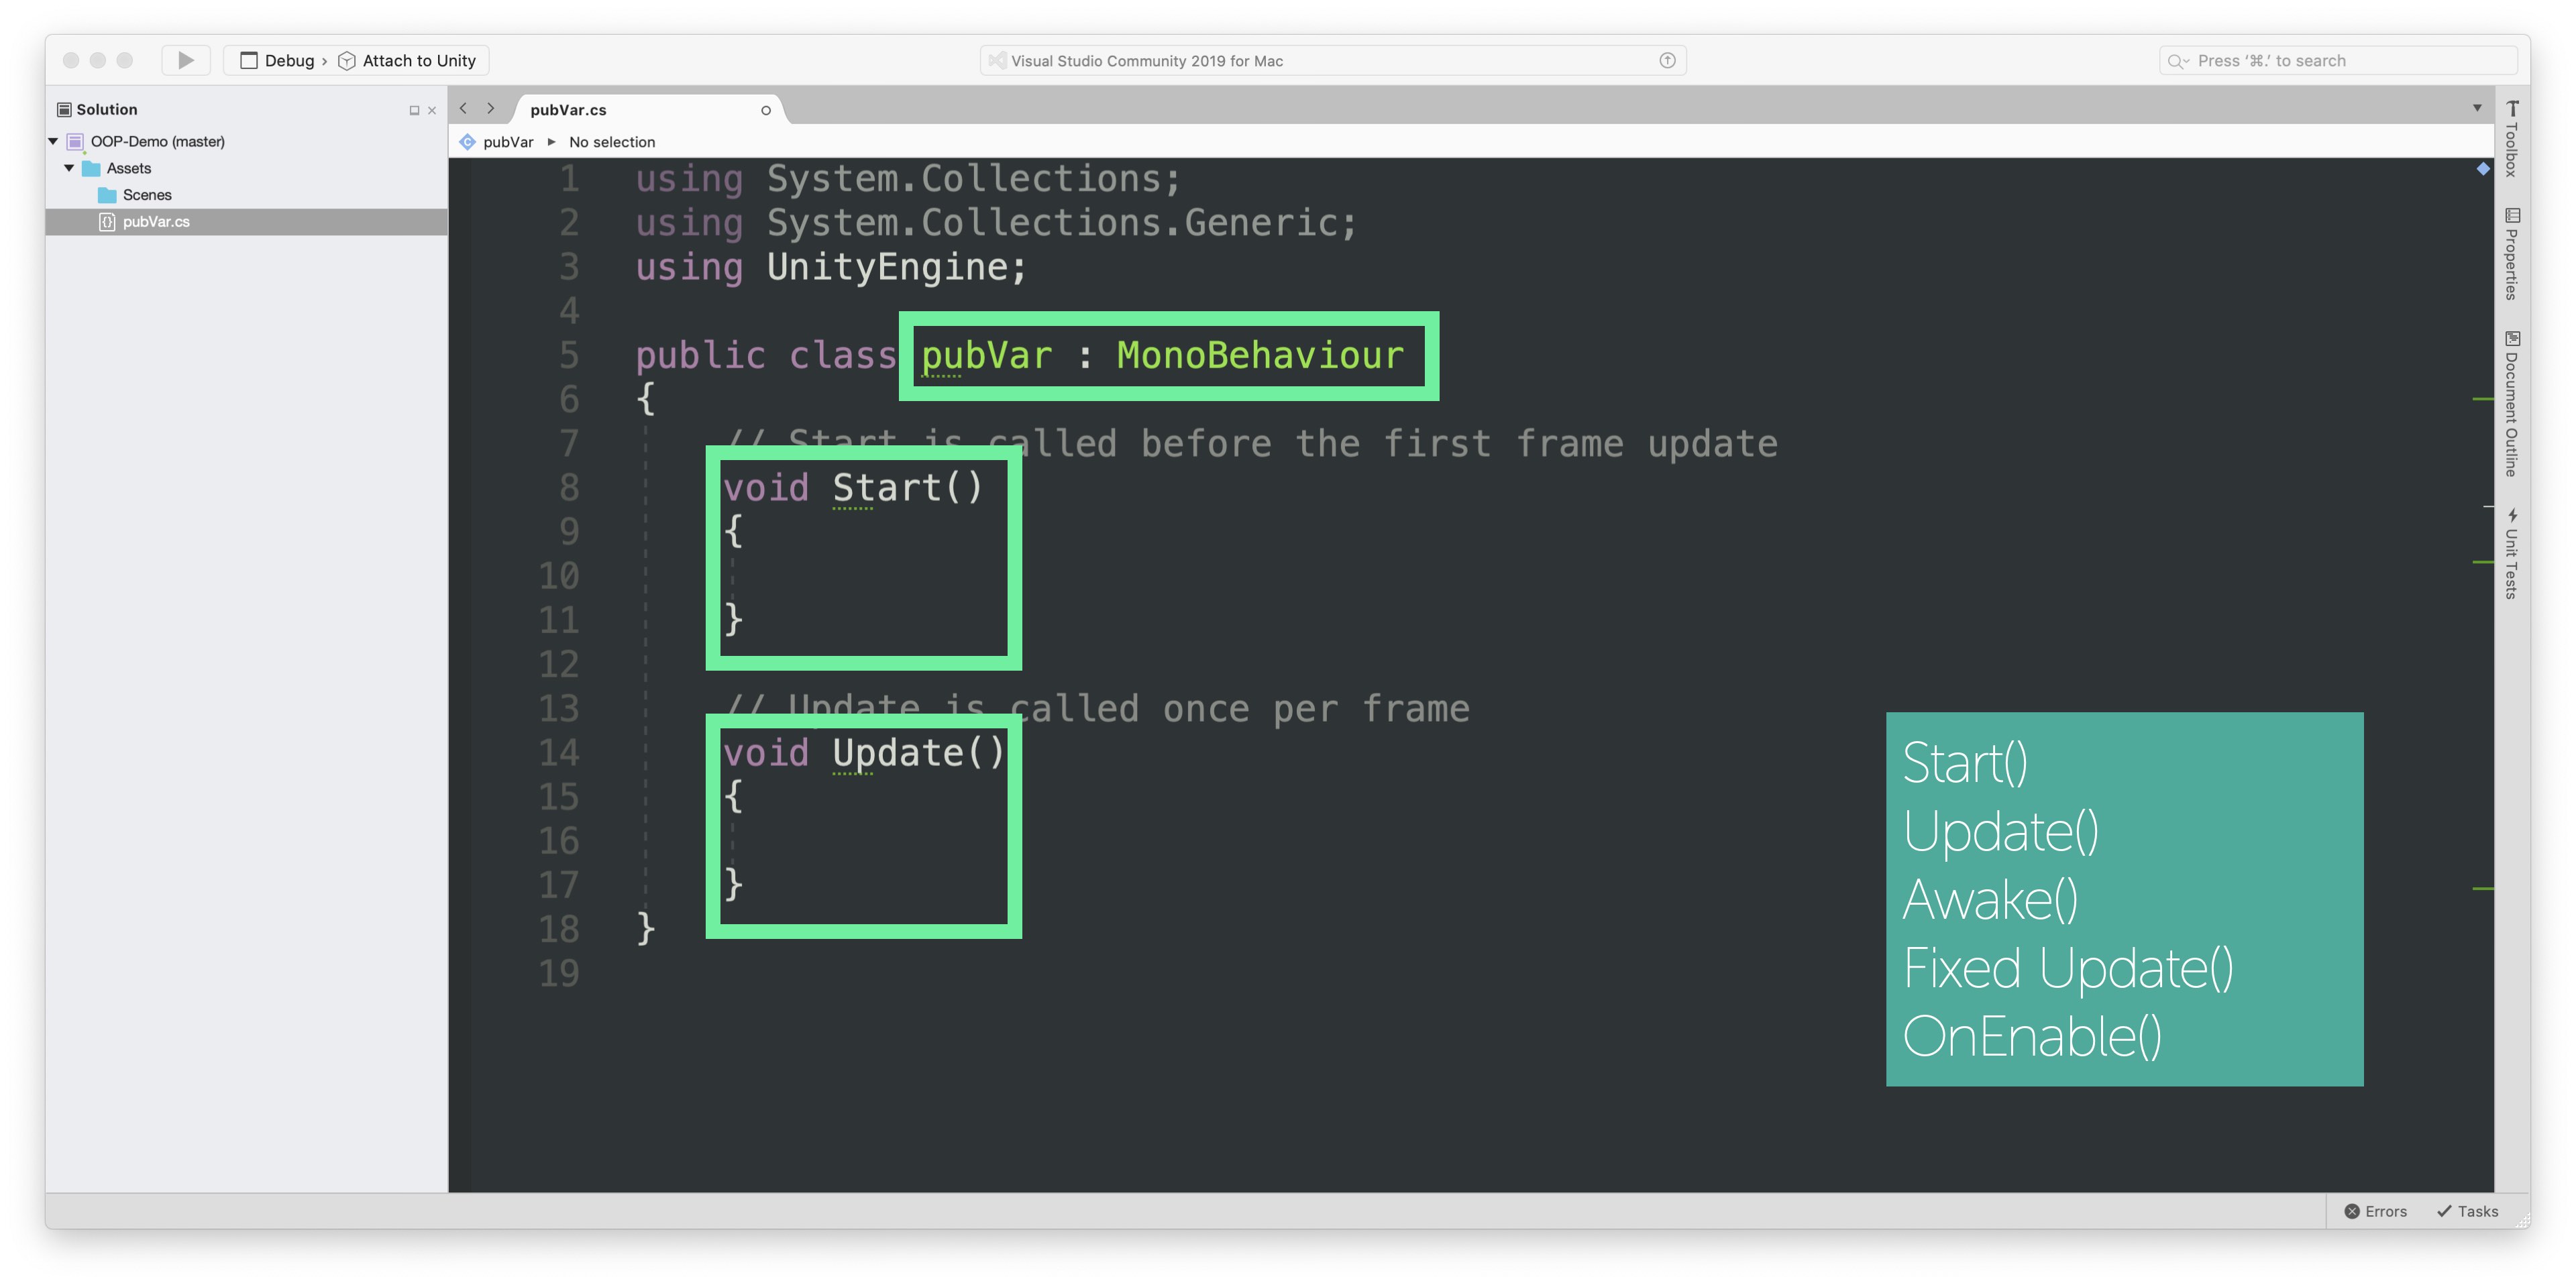 fig. 9 - Monobehaviour
Another way to understand the application of inheritance is how it is represented in Unity. The MonoBehaviour class is a base class from which every Unity script derives. It is automatically parented when you create a script in Unity. Any child say pubVar in the example has access to the principle Monobehaviour methods like Start() , Update() ,Awake(), FixedUpdate and onEnable() as well as many more. For more information about MonoBehaviour look at the reference to it here in the Unity API:
https://docs.unity3d.com/ScriptReference/MonoBehaviour.html
Polymorphism
Polymorphism is another way to work with inheritance. Say we have a parent and a series of children. They all have methods of the same name but with different outputs.
class  Fruit  // Base class (parent)
{
	public  void fruitColour()
	{
		Console.WriteLine("Fruit has many colours");
	}
}
class  Strawberry : Fruit  // Derived class (child)
{
	public  void fruitColour()
	{
		Console.WriteLine2("Red");
	}
}
class  Kiwi : Fruit  // Derived class (child)
{
	public  void fruitColour()
	{
		Console.WriteLine("Green");
	}
}
This can give confusing results as the base class or parent overrides the child methods due to inheritance. We can overcome this using override.
class  Game
{
	static  void  Main(string[] args)
	{
		// Create a Fruit object
		Fruit  myFruit = new  Fruit();
		// Create a Strawberry object
		Fruit  myStrawberry = new  Strawberry();
		// Create a Kiwi object
		Fruit  myKiwi = new  Kiwi();

		myFruit.fruitColour();
		myStrawberry.fruitColour();
		myKiwi.fruitColour();
	}
}
The output would be this:
Fruit has many colours
Fruit has many colours
Fruit has many colours
Override
Using the keyword override we can effectively allow child methods to override the parent.
class  Fruit  // Base class (parent)
{
	public  void fruitColour()
	{
		Console.WriteLine("Fruit has many colours");
	}
}
class  Strawberry : Fruit  // Derived class (child)
{
	public  override void fruitColour()
	{
		Console.WriteLine("Red");
	}
}
class  Kiwi : Fruit  // Derived class (child)
{
	public  override void fruitColour()
	{
		Console.WriteLine("Green");
	}
}
class  Game
{
	static  void  Main(string[] args)
	{
		// Create a Fruit object
		Fruit  myFruit = new  Animal();
		// Create a Strawberry object
		Fruit  myStrawberry = new  Strawberry();
		// Create a Kiwi object
		Fruit  myKiwi = new  Kiwi();

		myFruit.fruitColour();
		myStrawberry.fruitColour();
		myKiwi.fruitColour();
	}
}
The output would then become this:
Fruit has many colours
Red
Green
Composition
Another useful extension to inheritance is Composition and the use of Interfaces. When considering a use case it is worth thinking about whether you have general rules or specialist rules.
Inheritance vs Composition
It alls depends on whether you want to Generalise or Specialise
- Inheritance - Strawberry is a Fruit but Fruit is not a Strawberry A strict tree model
- Composition - Fruit can be made up of Kiwi and/or Strawberry.
You can pick and choose
Another useful extension to inheritance is Composition and the use of Interfaces. When considering a use case it is worth thinking about whether you have general rules or specialist rules. Inheritance is great when you have a cascading tree of dependencies. The rule of inheritance is that it’s a strict model as we’ve seen before where things are all part of a larger whole or tree. Composition is where you have a class that you want to include some but maybe not all of a series of other classes.
Composition using Interfaces
An Interface defines a contract that must be implemented by a class. The interface doesn’t provide any functionality, just a signature that must be implement by a class which implements the interface. The interface is defined by using I keyword followed by the name of interface and it has no body but just the method it is linked to. In the example class Kiwi can now have a series of Interfaces that can be accessed.
// Interface
interface  IFruit
{
	void  eatFruit(); // interface method (does not have a body)
}
interface  IfruitColour
{
	void  fruitColour();
}
// Kiwi "implements" the IFruit and IfruitColour interface
class  Kiwi : IFruit, IfruitColour
{
	public  string  foodType = "Fruit";
	public void eatFruit()
	{
		Console.WriteLine("Eating:" + foodType);
	}
	public  string  fruitType = "Kiwi";
	public  void  fruitColour()
	{
		Console.WriteLine("This "+fruitType +"is Green");
	}
}
class  Game
{
	// Create a myKiwi object
	Kiwi myKiwi = new Kiwi();

	// Call the methods invoked by the interface
	Kiwi.eatFruit();
	Kiwi.fruitColour();
}
The class Kiwi has the interfaces IFruit and IFruitColour linked to it, so a new instance can call the methods eatFruit and FruitColor. In this way a class can be composed of a shopping list of methods rather than being tied into a strict inheritance model.
You then get this output:
Eating Fruit
This Kiwi is green
Abstraction
Indicates that a class is intended only to be a base class of other classes, not instantiated on its own. Members marked as abstract must be implemented by non-abstract classes that derive from the abstract class.
Abstract classes are very often, if not always, used to describe something abstract, something that is more of a concept than a real thing. They are often used to describe a complete software framework and are not used frequently.
abstract  class  Animal
{
	// Abstract method (does not have a body)
	public  abstract  void  animalSound();
	// Regular method
	public  void  sleep()
	{
		Console.WriteLine("Zzz");
	}
}
// Derived class (inherit from Animal)
class  Pig : Animal
{
	public  override  void  animalSound()
	{
		// The body of animalSound() is provided here
		Console.WriteLine("The pig says: oink!”);
	}
}
From the example above, it is not possible to create an object of the Animal class. To access the abstract class, it must be inherited from another class.
class  Program
{
	static  void  Main(string[] args)
	{
		Pig  myPig = new  Pig(); // Create a Pig object
		myPig.animalSound(); // Call the abstract method
		myPig.sleep(); // Call the regular method
	}
}
The abstract parent class can only be accessed by it’s child. The Animal sound method is only accessible because it being called from Pig not Animal.
OOP in Embedded Systems
 fig. 10 - Traffic Lights - A classic embedded system
Let’s use a classic embedded system - a traffic light. You are designing a city wide traffic system with 100’s of different junctions with different needs. We could program our traffic lights to come on in a timed sequence. Which is fine if the timings never change, but some routes are busier than others and the timings need to reflect that and change during rush hours. We also may need to have a traffic light with only a green and a red light.
Traffic Light Example
Rather than program each new set up for every junction we create a class with inheritance to handle each different type of light.
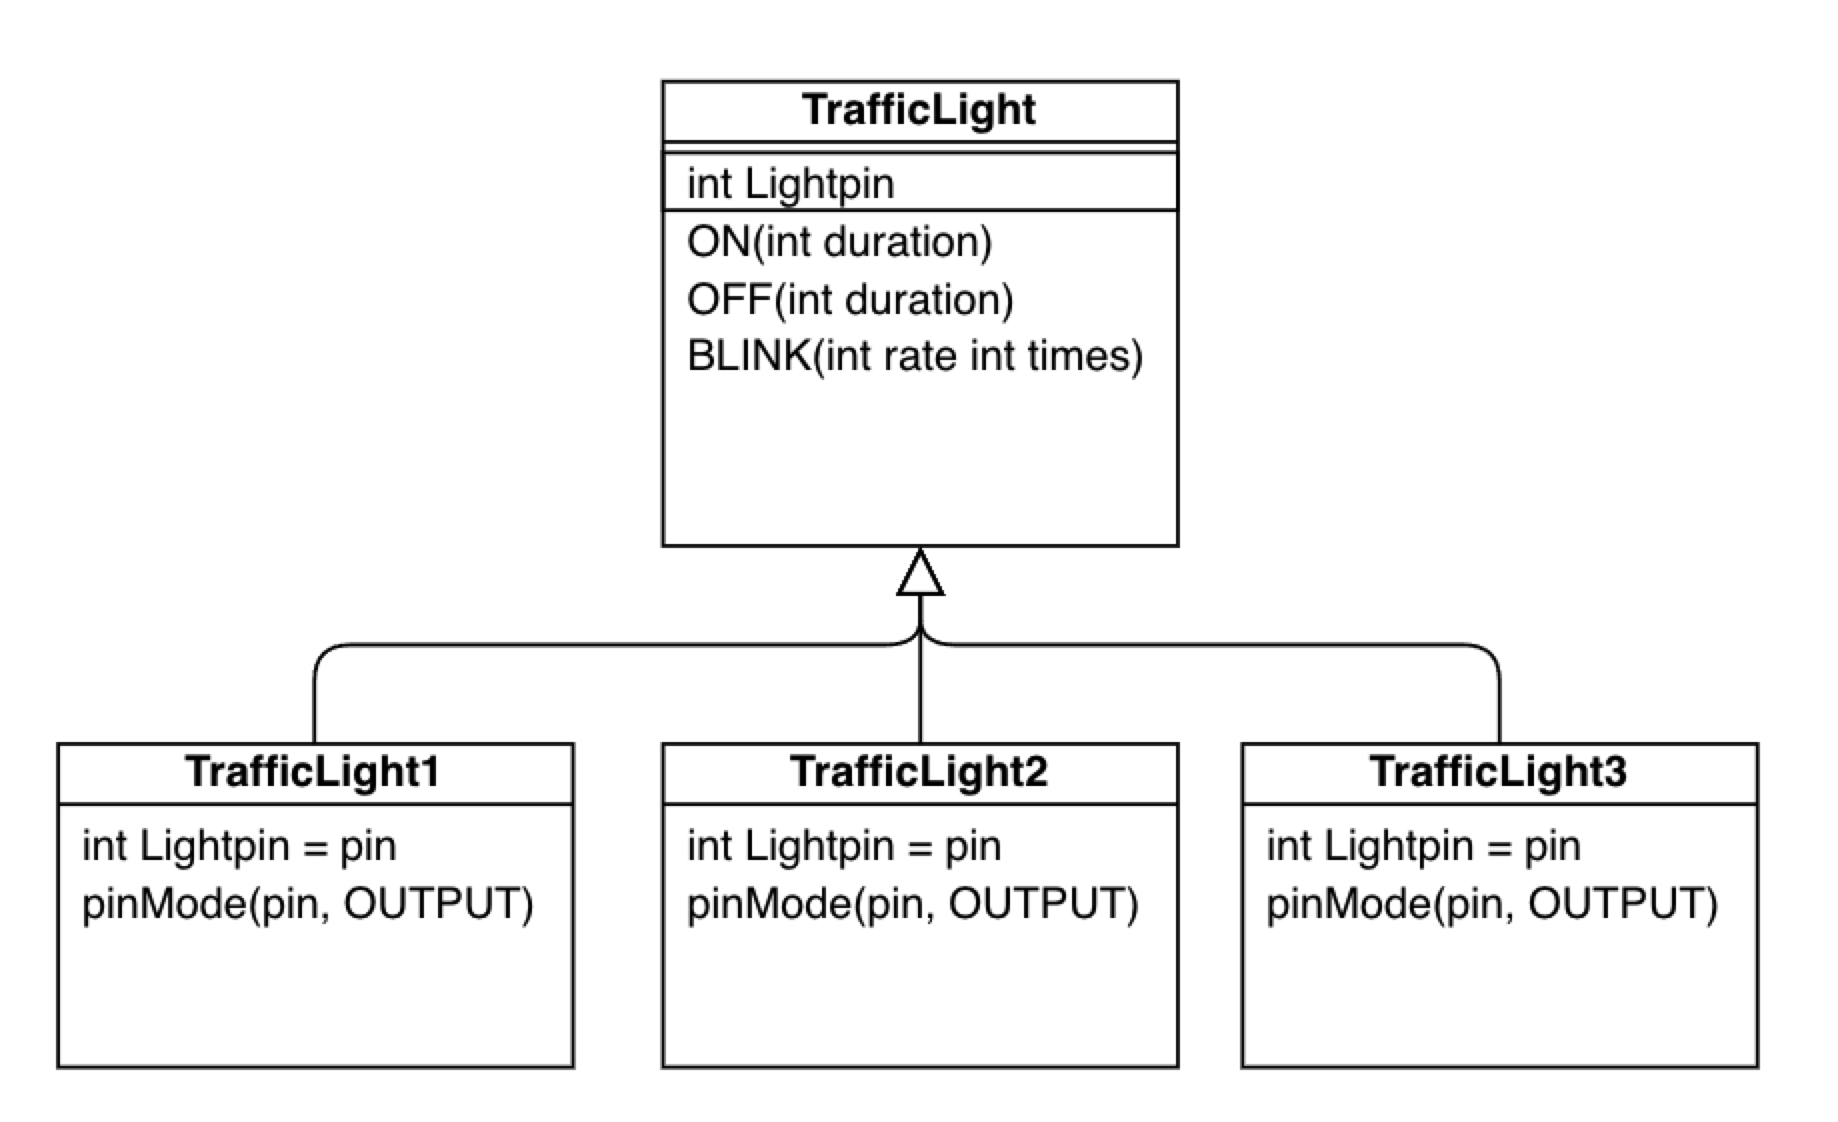 fig. 11 - Class Diagram for Traffic Light System
In the example above we have a ‘TrafficLight’ class and with each instance of the class we can trigger a time delay for off and one for on and we can also set a duration for a blinking light through a variable.
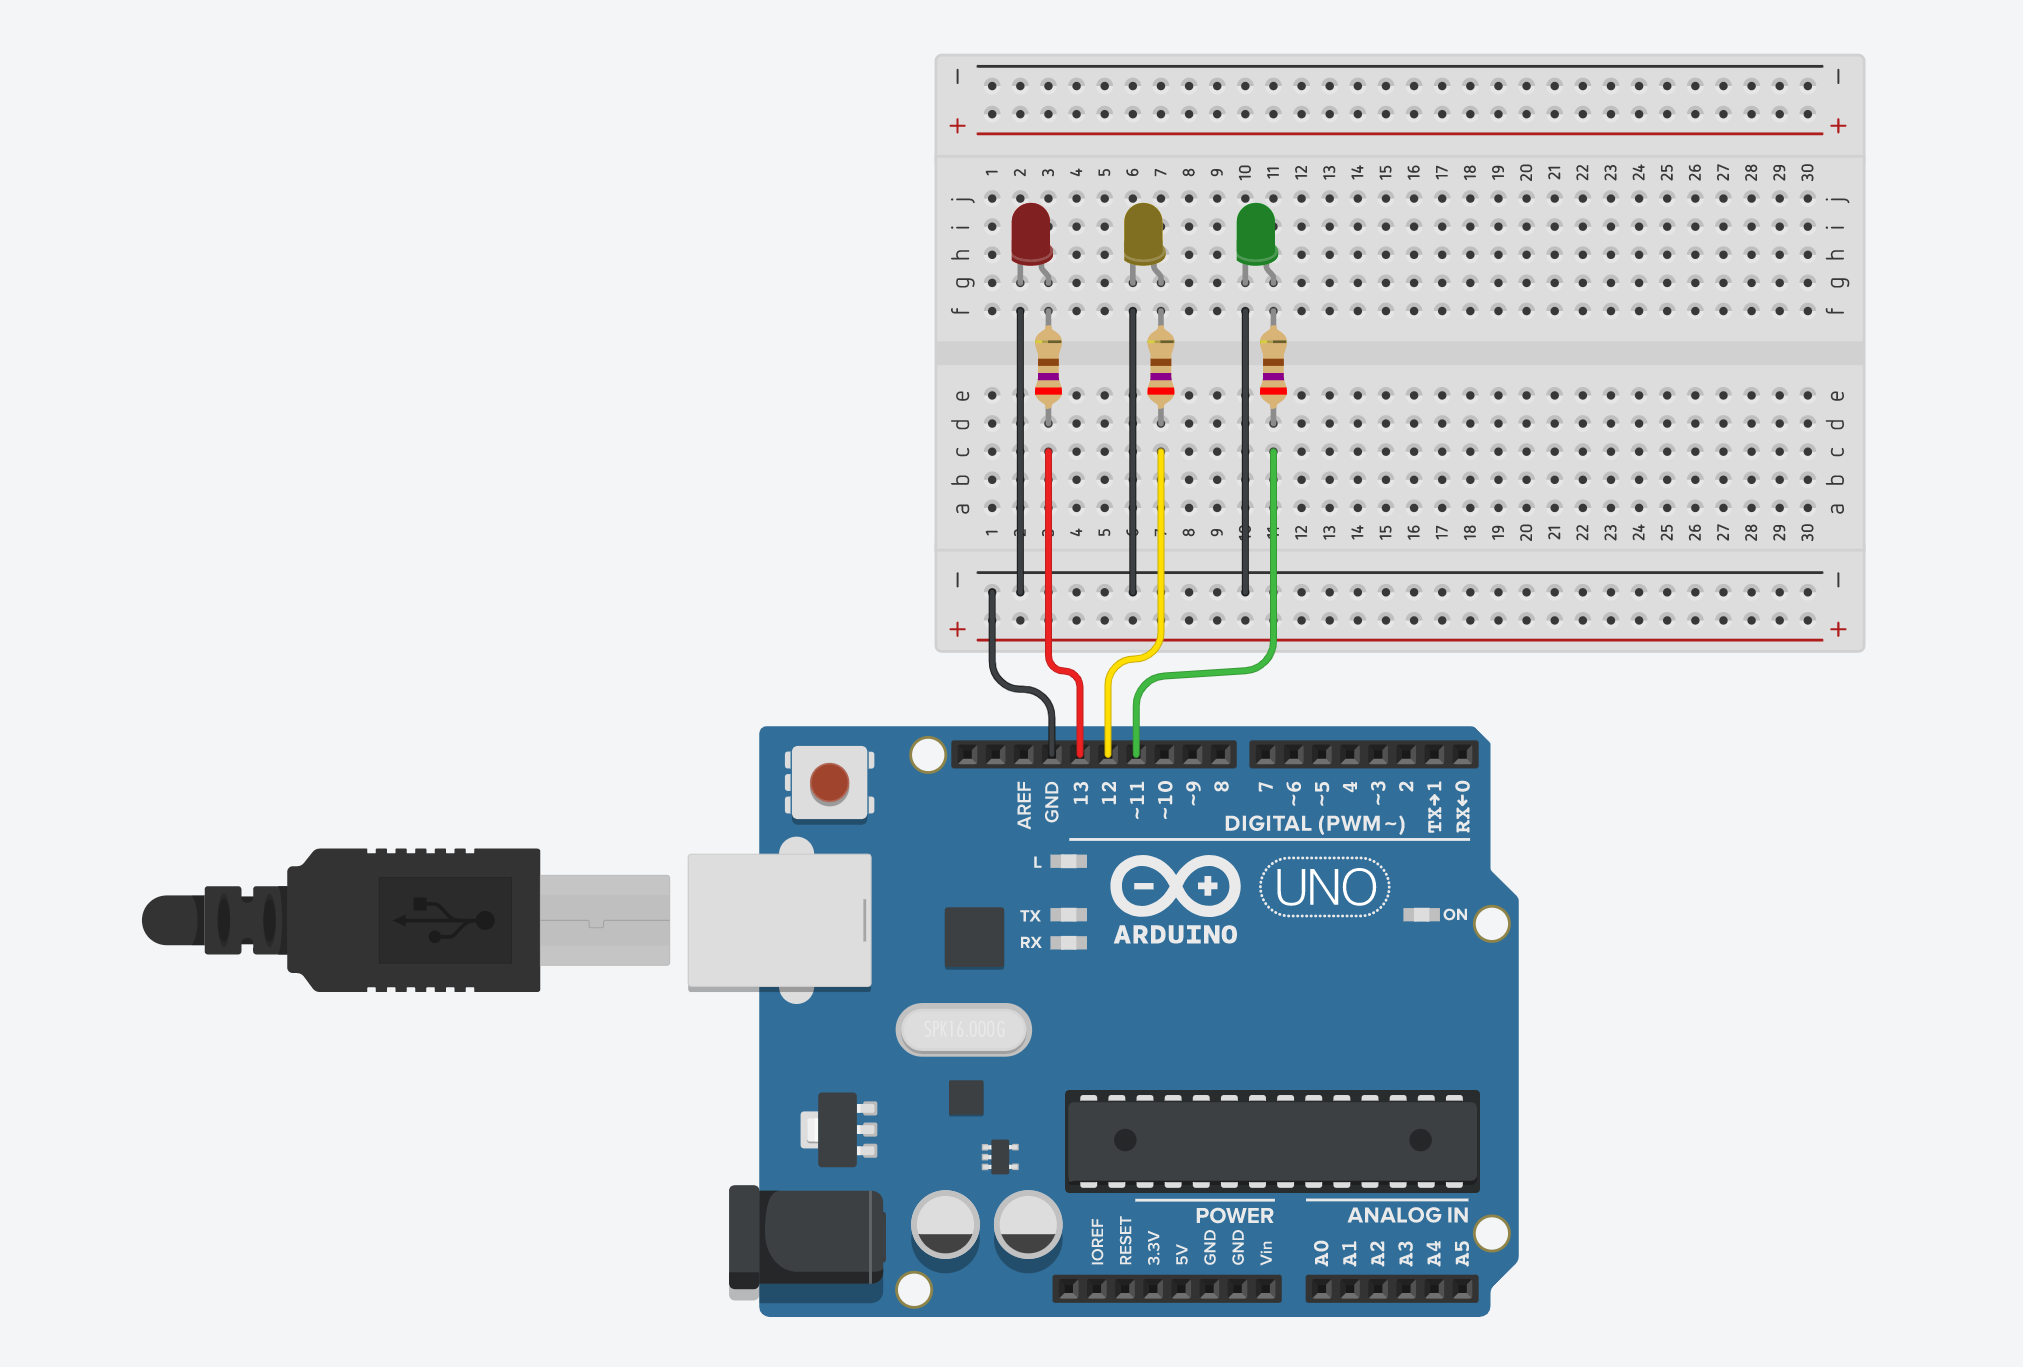 fig 12. - Traffic Light Circuit on TinkerCAD
View Circuit on TinkerCad
In the TinkerCAD version presented in the link above we have created a rought apporaximation of OOP in a C++ you can see that class Traffic_Light has been defined and 3 instances of Traffic_Light have been created - Red, Amber and Green. Then the methods are called at runtime in the loop function as shown in Red.ON(3000); for example.
Code in TinkerCAD
class Traffic_Light
{
	int Lightpin;
	public:
	Traffic_Light(int pin)
	{
		Lightpin = pin;
		pinMode(Lightpin, OUTPUT);
	}
	void ON(int duration)
	{
		digitalWrite(Lightpin, HIGH);
		delay(duration);
		digitalWrite(Lightpin, LOW);
	}
	void OFF(int duration)
	{
		digitalWrite(Lightpin, LOW)
		delay(duration);
	}
	void BLINK(int rate, int times) {
		for(int i=0; i < times; i++) {
		 	digitalWrite(Lightpin, HIGH);
		   	delay(rate);
		   	digitalWrite(Lightpin, LOW);
		   	delay(rate);
	  	}
	}
};

Traffic_Light Red(13);
Traffic_Light Amber(12);
Traffic_Light Green(11);

void setup()
{
}

void loop()
{
	Red.ON(3000);
	Amber.ON(1000);
	Green.ON(3000);
	Amber.BLINK(200,20);
}
Creating Libraries and Extension in C++
In C# you have a class file (class.cs for example) then the properties of the class are instantiated through the main program.cs file.
In C++ if we want to start developing objects, classes and eventually full fledged libraries, we create a sketch file in the Arduino IDE that has the runtime functions in it. We also need a CPP file which is a standard C++ file (.ccp) which will contain our extension or class and then we also need additionally a header file that has the extension (.h).
In C++ the header file contains:
- Function definitions
- Data type definitions
- Macros
The header file allows the sketch (.ino) to access the class properties content in the .cpp. But you have to use hash include and the name of the header file. For example#include “Class.h"
Let’s take the original TinkerCAD version and update it to function as a proper C++ library.
So we take the TinkerCAD example and break it down into 3 files. An INO which contains the sketch that create the instances of the class and defines their properties at runtime. We have a header file which defines all the functions and data types and then a CPP file which contains the definition of the Traffic light class itself.
trafficLight.ino
#include <TrafficLight.h>

TrafficLight Red(13);
TrafficLight Amber(12);
TrafficLight Green(11);

void setup() {
}

void loop() {
	Red.ON(3000);
	Amber.ON(1000);
	Green.ON(3000);
	Amber.BLINK(200,10);
}
trafficLight.cpp
#include "Arduino.h"
#include "TrafficLight.h"

TrafficLight::TrafficLight(int pin)
{
	pinMode(pin, OUTPUT);
	LightPin = pin;

}
void TrafficLight::ON(int duration)
{
	digitalWrite(LightPin, HIGH);
	delay(duration);
	digitalWrite(LightPin, LOW);
}

void TrafficLight::OFF(int duration)
{
	digitalWrite(LightPin, LOW);
	delay(duration);
}

void TrafficLight::BLINK(int rate, int times) {
	for(int i=0; i < times; i++) {
		digitalWrite(LightPin, HIGH);
		delay(rate);
		digitalWrite(LightPin, LOW);
		delay(rate);
	}
}
TrafficLight.h
#ifndef TrafficLight_h
#define TrafficLight_h
#include "Arduino.h"

class TrafficLight
{
	public:
		TrafficLight(int pin);
		void ON(int duration);
		void OFF(int duration);
		void BLINK(int rate, int times);
	private:
		int LightPin;
};
#endif
In this way way create a neat and terse method of deploying where implementation is modular and easy to change in a few lines of code. We have a library for a traffic light that we can use for all the cities junctions and traffic lights.
All the files for this example are available at this repository
Let’s see the final embedded version on an actual breadboard.
fig 13. - Traffice Lights running on an Arduino
Conclusion
In this lecture we have now covered all the principles of OOP programming that we set to explore at the beginning.
- Objects - is an abstract data type. It can include multiple properties and methods and may even contain other objects.
- Classes - a class is a template definition of the method s and variables in a particular kind of object.
- Encapsulation – It describes the idea of bundling data and methods that work on that data within one unit. It is also used to hide the internal representation, or state, of an object from the outside.
- Properties - a member of an object that controls how one field may be accessed and/or modified.
- Composition – Objects can be composed of other objects
- Inheritance – Objects can be related to other objects
- Polymorphism – Objects can be used via references to their parent class
- Abstraction - A restricted class that cannot be used to create objects (to access it, it must be inherited from another class).
It’s important that you now start to implement some or all of these principles into your code for this module but also your game development modules. You will only truly see it’s relevance if you apply it to your own practice.
OOP is like a skeleton or framework for the code that performs useful operations in your applications. Initially it can feel like extra work or adding additional complexity but actually the reverse is true, with practice it makes your code more lightweight, modular and secure.